Mostrando postagens com marcador JavaEE 6. Mostrar todas as postagens

domingo, 11 de agosto de 2013

Running Websockets on OpenShift


WebSocket is a pretty new and important technology in which it is possible to send message frames from server to clients without opening multiple HTTP connections. Although it is has been proven to be a solid and consolidated specification, running websockets in the existing cloud platforms is still a pain in the ass. The main cloud players do not provide enough support for WebSocket protocol due to the lack of application servers’ readiness and due to other issues related to the routing layer.

Knowing those difficulties, I’ve decide to post the steps to help eager people to use Red Hat OpenShift PaaS to run a websocket apps in the cloud. So, let's start from the beginning.


  • First of all, you must sign up in the OpenShift web site
  • Then you must add a new application
    • Pick Do-It-Yourself (DIY) cartridge
      • This will allow you to use a “pure Linux server” to do whatever you would like to do. In the specific case of this post, we are going to install an embedded web application in order to provide the required support for websockets.
    • Once DIY cartridge have been selected, you must fill out the application name and click on ‘Create Application’ button
    • Finally, do a ‘git clone’ according instructions

At this point, we have already prepared our Linux server on the cloud to install our application according our needs. Now, let’s make the required changes in the working copy we have just cloned from OpenShift master repository.

The changes are:
  • Update the shell script file which will be used by OpenShift to start our app
    • File: .openshift/action_hoooks/start 
    • Content: 

#!/bin/bash
# The logic to start up your application should be put in this
# script. The application will work only if it binds to
# $OPENSHIFT_DIY_IP:8080


echo "Starting WebSocketExample............. $OPENSHIFT_DIY_IP:$OPENSHIFT_DIY_PORT"
nohup java -jar $OPENSHIFT_REPO_DIR/diy/WebSocketExample.war > $OPENSHIFT_DIY_DIR/logs/server.log 2>&1 &
echo "Started WebSocketExample............. $OPENSHIFT_DIY_IP:$OPENSHIFT_DIY_PORT"
  • Update the shell script file which will be used by OpenShift to stop your app
    • File: .openshift/action_hoooks/stop 
    • Content:

#!/bin/bash
source $OPENSHIFT_CARTRIDGE_SDK_BASH


echo "Stopping WebSocketExample............."
if [ -z "$(ps -ef | grep WebSocketExample.war | grep -v grep)" ]
then
   client_result "WebSocketExample Application is already stopped"
else
echo "Killing WebSocketExample............."
   kill `ps -ef | grep WebSocketExample.war | grep -v grep | awk '{ print $2 }'` > /dev/null 2>&1
fi
echo "Stopped WebSocketExample............."
  • Add the embedded jetty application in the ‘Do It Yourself’ directory
    • Directory: diy
      • In this example, we have used the ‘WebSocketExample.war’ app name in order to match out our start/stop scripts.
      • Important note about the embedded jetty application file: 
        • There are some peculiaridades in the implementation of the class com.embedded.JettyStarter (shown below in red) which must be changed in order to bind the embedded app to the right IP and PORT number in the OpenShift platform. 
        • Content:

public class JettyStarter {
       public static void main(String[] args) throws Exception{
               ProtectionDomain domain = JettyStarter.class.getProtectionDomain();
               URL location = domain.getCodeSource().getLocation();
       
               // create a web app and configure it to the root context of the server
               WebAppContext webapp = new WebAppContext();
               webapp.setDescriptor("WEB-INF/web.xml");
               webapp.setConfigurations(new Configuration[]{ new AnnotationConfiguration()
        , new WebXmlConfiguration(), new WebInfConfiguration(), new MetaInfConfiguration()        
        //, new FragmentConfiguration(), new EnvConfiguration(), new PlusConfiguration()
                });
               webapp.setContextPath("/");
               webapp.setWar(location.toExternalForm());
       
               // starts the embedded server and bind it to openshift variables        
               String host = System.getenv("OPENSHIFT_DIY_IP");
               String port = System.getenv("OPENSHIFT_DIY_PORT");
               System.out.println(host + ":" + port);
               InetSocketAddress sa = new InetSocketAddress(getByName(host), valueOf(port));
               Server server = new Server(sa);


               server.setHandler(webapp);        
               server.start();
               server.join();
       }
}

After script files have been configured and the embedded application has been put in the ‘diy’ directory, you must commit and push changes back to the master repository.
  • The commands are:
    • git commit -m 'My changes'
    • git push
  • As soon as the push finishes, the stop/start scripts will run
    • If you notice it didn’t run accordingly, remote access your openshift server and check if everything is ok. Remember: it is Red Hat Linux, so you should be ok checking your stuff.
    • Try to check if start/stop scripts have execution permission (not sure why, but I have this issue in some experiments).
      • ls -lt $OPENSHIFT_REPO_DIR/.openshift/action_hooks/
    Finally, are done. \o/
      Access 'ws://[YOUR APP].rhcloud.com:8000/example' using your favorite WebSocket tool and check it by yourself.
        Don't have a WebSocket tool?  Take a look on ‘Advanced REST client’ for Chrome

        The openshift configuration used in this example can be found here.
          Thanks for reading


          domingo, 14 de julho de 2013

          Fixing Run-Jetty-Run Eclipse Plugin to Run Websockets


          Run-Jetty-Run is an Eclipse plugin for running and debugging web apps using Jetty container. Although it has been a great and useful tool in the past days, lately, when I was playing around with websockets, I’ve found it was not working properly as it should.


          It is important to say that the current stable build of Run-Jetty-Run plugin does not support the latest Jetty version (i.e. 9.0.4), so it became necessary to get its nightly build. Once I downloaded it, I've noticed it was not up-to-date either. Actually the last nightly build is pretty old too (the build date is 01/02/2013) and, unfortunately, it only supports Jetty 9.0.0.M3.


          So, If you are facing the below issue or if you are a curious person, I would suggest you to keep reading.


          java.util.ServiceConfigurationError: org.eclipse.jetty.websocket.servlet.WebSocketServletFactory: Provider org.eclipse.jetty.websocket.server.WebSocketServerFactory not found
          at java.util.ServiceLoader.fail(ServiceLoader.java:231)
          at java.util.ServiceLoader.access$300(ServiceLoader.java:181)
          at java.util.ServiceLoader$LazyIterator.next(ServiceLoader.java:365)
          at java.util.ServiceLoader$1.next(ServiceLoader.java:445)
          at org.eclipse.jetty.websocket.servlet.WebSocketServlet.init(WebSocketServlet.java:136)
          at javax.servlet.GenericServlet.init(GenericServlet.java:242)
          at org.eclipse.jetty.servlet.ServletHolder.initServlet(ServletHolder.java:516)
          at org.eclipse.jetty.servlet.ServletHolder.getServlet(ServletHolder.java:398)
          at org.eclipse.jetty.servlet.ServletHolder.handle(ServletHolder.java:642)
          at org.eclipse.jetty.servlet.ServletHandler.doHandle(ServletHandler.java:445)
          at org.eclipse.jetty.server.handler.ScopedHandler.handle(ScopedHandler.java:138)
          at org.eclipse.jetty.security.SecurityHandler.handle(SecurityHandler.java:564)
          at org.eclipse.jetty.server.session.SessionHandler.doHandle(SessionHandler.java:213)
          at org.eclipse.jetty.server.handler.ContextHandler.doHandle(ContextHandler.java:1054)
          at org.eclipse.jetty.servlet.ServletHandler.doScope(ServletHandler.java:372)
          at org.eclipse.jetty.server.session.SessionHandler.doScope(SessionHandler.java:175)
          at org.eclipse.jetty.server.handler.ContextHandler.doScope(ContextHandler.java:988)
          at org.eclipse.jetty.server.handler.ScopedHandler.handle(ScopedHandler.java:136)
          at org.eclipse.jetty.server.handler.HandlerWrapper.handle(HandlerWrapper.java:97)
          at org.eclipse.jetty.server.Server.handle(Server.java:410)
          at org.eclipse.jetty.server.HttpChannel.run(HttpChannel.java:245)
          at org.eclipse.jetty.server.HttpConnection$1.run(HttpConnection.java:75)
          at org.eclipse.jetty.util.thread.QueuedThreadPool.runJob(QueuedThreadPool.java:597)
          at org.eclipse.jetty.util.thread.QueuedThreadPool$3.run(QueuedThreadPool.java:528)
          at java.lang.Thread.run(Thread.java:722)


          Once the Run-Jetty-Run team seems to not be working anymore and since there were some changes in the internal Jetty API, I’ve decided to fix it by myself and to post the result to make life simple for everyone trying to run websockets into Eclipse.


          It is important to say that this fix was tested only in the Eclipse Kepler. So, in order to avoid other issues, ensure you have the latest version of Kepler IDE. After that, you can follow the following steps:


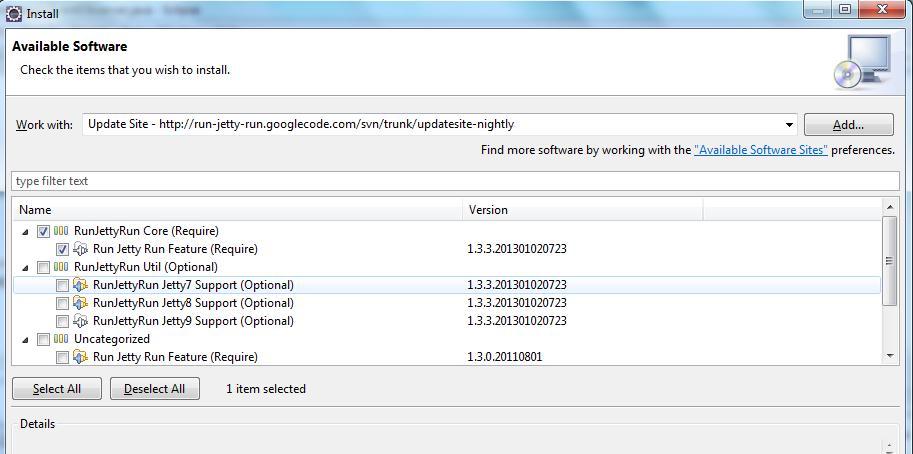
          1. First of all, you must install the core of the Run-Jetty-Run plugin.
            1. For that, go to Help -> Install New Software.
            2. Then, enter the http://run-jetty-run.googlecode.com/svn/trunk/updatesite-nightly URL and install the Run Jetty Run Feature (Required)
          2. Once the core plugin has being installed, you must install my customized support for running Jetty 9.0.4.
            1. Copy the downloaded jar into the /<YOU_ECLIPSE_KEPLER_HOME>/plugins
            2. And, restart the eclipse
          3. Finally, right click on your websocket app and choose RunAs -> Run Jetty
            1. In Jetty tab, select the following Jetty Version: Jetty 9.0.4.by.Rubbo
            2. In Jetty Classpath tab, add your project in the Custom Jetty Classpath
              1. It is important to say that this step is only necessary because there is another bug in the core plugin which I didn’t want to lose my time to fix.
            3. So, we are done!!
              1. Click in the Run button and have fun..


          Hope I’ve helped to make your life simple. ;-)

          Thanks for reading.

          domingo, 23 de junho de 2013

          Using WebSockets to implement Dashboards


          Dashboards are extremely important tools mostly used for monitoring systems and environments. The main idea of these tools is to keep clients up-to-date with arriving or changing data on the server side. For that, the most popular technique used in web applications is based on ajax polling. With ajax, the client polls the server for data every time the content of the page requires an update.


          Once the idea of monitoring is to show actual data information, there are several problems with current ajax technique. The first one is scalability. The number of requests made to the server can be extremely high if the frequency of polling is set to a small value. Not only the server but also the network can become saturated with all those requests. On the other hand, if we set a high value for the pooling frequency, some information may be lost or delayed. Another problem is that the response may not contain any data. So, in these cases, ajax polling overloads the server for nothing.


          Fortunately, in December 2011, a new protocol called WebSocket was defined. As the spec says: “The goal of this technology is to provide a mechanism for browser-based applications that need two-way communication with servers that does not rely on opening multiple HTTP connections”. In other words, with Websocket protocol it is possible to send message frames from server to clients, once these clients have established an initial conversation, of course.


          Analyzing such a capability, it becomes clear that implementations of browser-based dashboards, chats, games, kanbans, planning pokers tools, etc should be rewritten to use WebSocket protocol. Therefore, the main idea of this post is to show how to implement a very simple dashboard using websockets.


          First of all, I would refer my article about how to create and embedded war with Jetty and Gradle. To make this post short and simple, I will assume you have already read that post or that you have a good knowledge about these subjects.


          Second, to start our example we will be adding support for websockets in an embedded Jetty. So, you have to create your build file called ‘build.gradle’ as shown below. Note the lines in red, which are the responsible to include the expected support.


          // Tells gradle it is a war project which will be imported into eclipse wtp
          apply plugin: 'war'
          apply plugin: 'eclipse-wtp'

          // Define souce code compatibility
          sourceCompatibility = 1.7
          targetCompatibility = 1.7

          // Use maven repository
          repositories {
                 mavenCentral()
          }

          // Fills out all dependencies which are necessary to start the embedded jetty into our war file
          configurations {
                 embeddedJetty
          }
          dependencies {
                 embeddedJetty 'org.eclipse.jetty:jetty-servlet:+'
                 embeddedJetty 'org.eclipse.jetty:jetty-webapp:+'
                 embeddedJetty 'org.eclipse.jetty:jetty-jsp:+'
                 embeddedJetty 'org.eclipse.jetty:jetty-annotations:+'

                 // add support for jetty implementation of websockets
                 embeddedJetty 'org.eclipse.jetty.websocket:websocket-server:+'

                 compile 'org.glassfish:javax.json:+'
          }

          war.baseName = 'WebSockets'
          war {
                 // unzip and add all jetty dependencies into the root of our war file
                 from {configurations.embeddedJetty.collect {
                                 project.zipTree(it)
                         }
                   }
                  // remove signature and unnecessary files
                  exclude "META-INF/*.SF", "META-INF/*.RSA", "about.html", "about_files/**", "readme.txt", "plugin.properties", "jetty-dir.css"
                  // include only the classes which will be used to start Embedded Jetty
                  from "$buildDir/classes/main"
                  exclude "com/myapp/"
                  // tells the class to run when the generate war be executed using 'java -jar'
                  manifest { attributes 'Main-Class': 'com.embedded.JettyStarter' }
          }

          // Once you will need some basic api (e.i. servlet api) for compilation, add embeddedJetty dependencies for compilation
          sourceSets.main.compileClasspath += configurations.embeddedJetty

          // the same for eclipse classpath, so you can use it to edit your java files
          eclipse {
                 classpath {
                         plusConfigurations += configurations.embeddedJetty
                 }
          }


          Unfortunately, Jetty 9 still does not support JSR 356 (JavaTM API for WebSocket). So we are going to use its current API in this example (which, by the way, is very similar to JSR 356). For that, initially we have to create a class for implementing our WebSocket as shown below.


          import org.eclipse.jetty.websocket.api.Session;
          import org.eclipse.jetty.websocket.api.annotations.OnWebSocketClose;
          import org.eclipse.jetty.websocket.api.annotations.OnWebSocketConnect;
          import org.eclipse.jetty.websocket.api.annotations.WebSocket;
           
          @WebSocket  
          public class DashboardWebSocket  {
                 @OnWebSocketClose
                 public void onClose(final Session session, int x, String text) {
                           EventGenerator.unregistry(new EventObserver(session));
                  }
                 @OnWebSocketConnect
                  public void onOpen(final Session session) {
                           EventGenerator.registry(new EventObserver(session));
                  }  
          }  


          The most important parts of the above class are the onOpen(..) and onClose(..) methods, which will be executed at any WebSocket open and close connections. In our example, each time a user decides to navigate to this app we will be registering his session as an event observer. Doing that, it is possible to broadcast to all registered sessions any event which has happened in the server side. In the same way, whenever that user closes the browser, the connection is lost and his session will be unregistered from the event observer list.


          Besides the WebSocket itself, using Jetty API, it is necessary to implement a WebSocketServlet to map and registry such WebSocket. In our example, each time an URI /dashboard is used; it will be redirected for this servlet.


          import org.eclipse.jetty.websocket.servlet.WebSocketServlet;
          import org.eclipse.jetty.websocket.servlet.WebSocketServletFactory;


          @SuppressWarnings("serial")
          @WebServlet(name = "Dashboard WebSocket Servlet", urlPatterns = { "/dashboard" })
          public class DashboardServet  extends WebSocketServlet {
                  @Override
                  public void configure(WebSocketServletFactory factory) {
                           factory.register(DashboardWebSocket.class);
                  }
          }


          Once these steps are done, it is necessary to use the JavaScript API to open the initial connection and make it wait for new message frames from the server. Note, in the below JS code, that we have used the protocol ‘ws’ instead of ‘http’. It is necessary because WebSocket is, actually, a different protocol.


          <script>
          var load = function() {
                  var socket = new WebSocket("ws://localhost:8081/dashboard");
                  socket.onmessage = function(event) {
                           // show the event.data in your graph, table or whatever
                  }
          }
          </script>


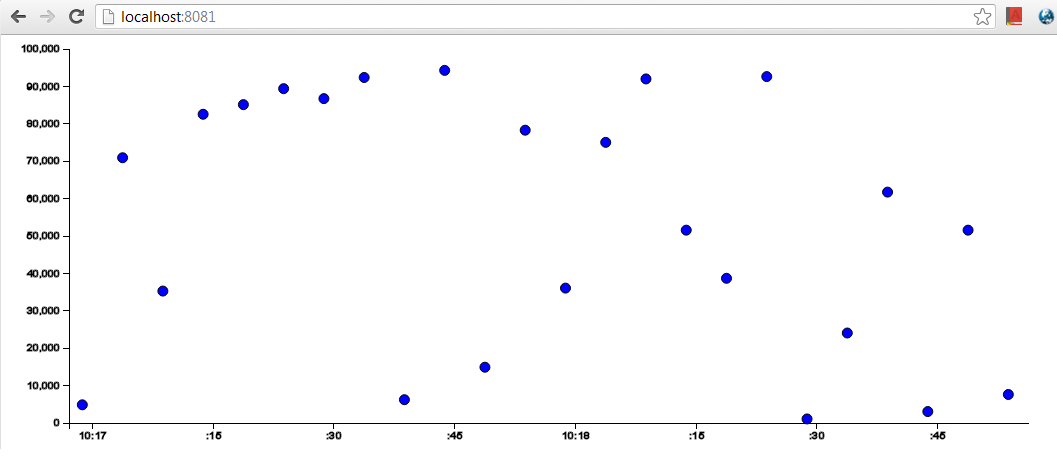
          In the above code, we presented a very simple implementation in which a WebSocket is opened and, on each server event, data is received as a parameter by the function onmessage(..). In below image it is possible to see a printscreen of the this app running. The points represent the event amount (for an example purpose we have used a random number from 0 to 100.000) and moment it have happened.


          In short I would say WebSocket is pretty important technology for building modern web applications in which, in the near future, it will be largely used for enterprise software as well for general web applications. However, it is still complicate to assume websockets as an unique strategy to replace long polling features because there exists firewalls and proxies which does not understand/support ‘ws’ protocol yet. Besides that, in the Java world, there are still few application servers which provide support for JSR 356 standard. So, we still have to wait some more months to use the API specified in that standard (p.s.: Glassfish already provides such implementation).


          If you would like to study and/or execute this example, you can download the full source code here. To start the dashbord, you have to build the war and then execute it with the following command line: ‘java -jar WebSockets.war’. This will start a Jetty server in port 8081, so you can access the http://localhost:8081/ url in the browser and see by yourself.


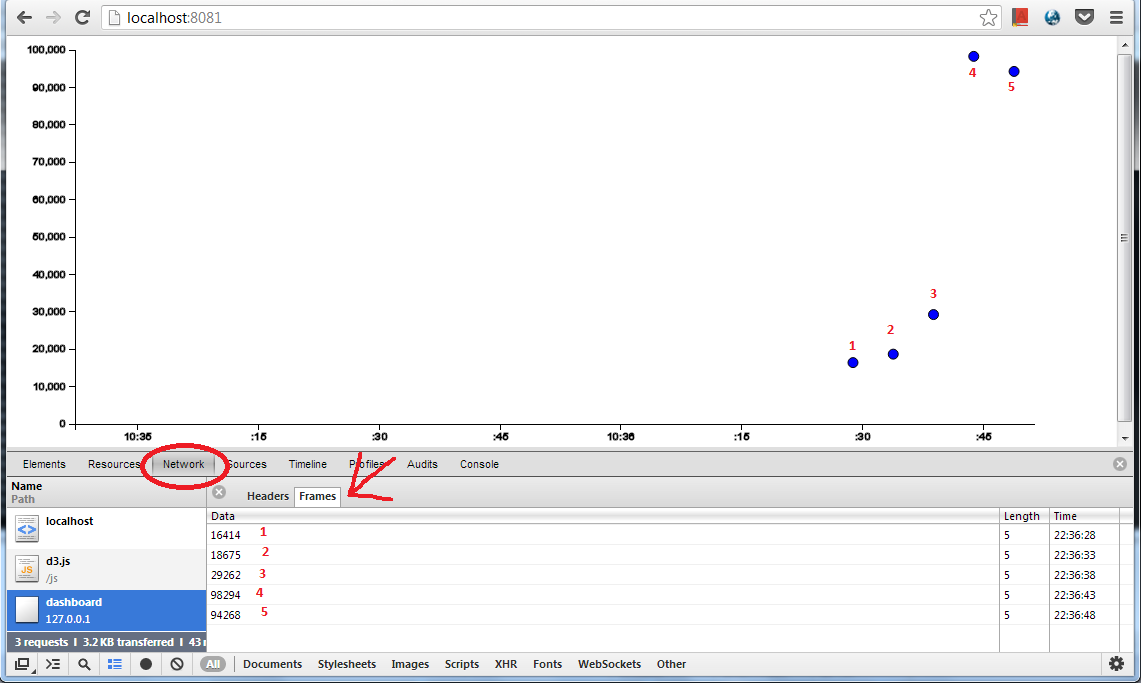
          Moreover, if you would like to understand how websocket frames are sent to the browser, I would suggest you to open the ‘Chrome Developer tools’ and click in ‘Network’ tab. In there, you will be able to see that this example app will be making no ‘http’ requests. But only one ‘ws’ connection. Clicking in the ‘ws’ connection you will be able to see the message frames being sent back from the server as shown in the image below.


          Thank you for reading!